01 June 2012

Fuztastic Fennel

...and a handsome fellow he is too...


So, it's only in recent history that I've discovered how much I like fennel. The first time I cooked it was an absolute disaster. To this day I still have no idea if it was hideously undercooked or a bad specimen. I had had such delicious fennel dishes (or usually as a side salad, often with orange) that I persisted with trial and error.

I now know it is delicious both raw (snap off some of the smaller inner pieces as a pretty and delicious fingerfood addition to an antipasto plate; or shave/slice thinly and dress for a fast and delicious salad) or roasted. You can eat all the parts - the fluffy leafies can be used as a very similar replacement for dill; the stalks and bulbs are crunchalicious and the seeds are (as Simon on The Cook and The Chef reminds us) the cause of the distinctive Italian pork and fennel sausages.

After lots of trial and error, my preferred method for roasting is as follows:


Roasted Fennel / Warm Fennel Salad

Line a large roasting pan with baking paper; and spray some olive oil on. Preheat oven.

Wash two large fennel bulbs (usually sold with about 3 inches of stalks and leaves poking out in a very mohawky style). Tear off the fluffy leaves and place into the roasting pan. Slice off the stalks from the bulb, slice off and discard top dried out portion, then slice stalks thinly and chuck into roasting pan. Cut the bulbs in half and slice very thinly. Try not to nibble on ALL the inner "petals" as chef's privileges whilst doing so, I challenge you! Place slices into roasting pan.

Drain (and -optional- cut in half) a small jar (or half a large jar) of pitted kalamata olives.

Mix fennel, a splash or spray of olive oil and a splash of white wine (or if you're detoxing water will do).

Cut a whole dwarf meyer lemon (or if you don't grow these on your balcony, half a regular lemon) in half lengthways, squeeze juice over contents of roasting pan then very very exquisitely (but don't cut yourself - lemon juice! ouchie!) thinly slice the lemon rind/flesh and put into the roasting pan on top (so people can opt to pick it off if they can't hack it).

Basically I tailor this to whatever else is in the oven. For al dente - if you want a quick cook go for 200° and 30-45 minutes (consider adding aluminium foil cover to prevent burning; if doing a roast or bake at 180° at the same time it will take you 45-75 minutes; slow roasting meat as well at 160°, will take approx 90 minutes - just keep checking back and taste for consistency, and mix occasionally to avoid too many top burnt bits.

Serve as a side dish or a large salad. Goes particularly well with the roast chicken a la Mediterranean that I have previously described.


To be honest, I hadn't blogged sooner about this mainstay of my vegie repertoire because it all seemed too simple. However, the simple things in life are often the most delicious. The other day I had heaps of this dish leftover, and a huge bag of Imperial mandarins - all good things to take advantage of in winter - and I had an epiphany - reheat this dish and top with thin (half a centimetre) slices of mandarin and hey presto - heaven is a place on earth in winter! Enjoy!


29 May 2012

Glass noodles come with a warning, but no sharp implements

This evening was a bit of a slow TV night, nothing to watch, grumpy grumpy grumpy. The fridge is also looking a bit sad and sorry tonight. Just the remains of a massive wine/cheese/antipasto platter I had for Eurovision (crud, all my chopping boards and knives are all filthily strewn about the apartment), a bottle of tomato juice and some leftover takeaway Chinese roast duck. Oh yeah, some random vegies rattling around in there too. Hmm, glass noodles in pantry. A-ha!
Wok on, ingredients in (in this order):
Shredded duck meat and skin by hand
A splash of olive oil
Green beans snapped into pieces
A bunch of watercress torn into short segments
Soy sauce
Dry sherry
Black pepper
Glass noodles (which I soaked in cold water at the start of the wokking)
Enoki mushrooms
The remainder of the takeaway plum sauce (I seem to have no sugar at all in my apartment at the moment)

Heat off, stir stir stir

Mmmmmmmm

Except I could not for the life of me convince myself to not have a third helping, even thought I KNOW that glass noodles swell up in my stomach and render me incapacitated with a mild bellyache for the rest of the night.

Ah, it was worth it. Yum yum yum!

18 May 2012

Ultimate comfort food - Sweetcorn Soup

A friend of mine was feeling a bit under the weather, and I remembered we had had a conversation about how much she used to love Sweetcorn Soup as a child when she was unwell. Luckily, I also remembered that my Mumsy had recently told me about how ridiculously quick and easy it is to make it. So on my way out to visit my friend, it was onto the parental bat-phone and a quick recap of the recipe. Here's what she told me:


Mumsy's Sweetcorn Soup

Empty one 420g tin/canful of creamed corn into a small saucepan.
Using the conveniently empty tin, add a 1:1 amount of water (ie one tinful).

{Add meat* if required at this stage}

Bring to the boil. {If using meat, wait until meat is cooked/heated through}
Meanwhile beat an egg.
Once saucepan contents are cooked/boiling, turn off heat and immediately vigorously stir in the beaten egg, it should cook and flake up instantaneously.
Add salt and/or pepper to taste.

Serve piping hot to patient on couch, preferably with some rubbish daytime television to watch on the side.


*Meat variations (Mum reckons no more than 10g/a couple of tablespoonsful):

1 - Shred some cooked chicken (eg store-bought BBQ chicken breast or leftover cooked chicken)
2 - Buy a small tin of pre-cooked crab meat
3 - Marinate some pork or beef mince/dice with a splash of soy sauce, a pinch of sugar & powdered garlic (and some dry white or sherry)


[Bonus recipe:


Mumsy's "Diced Pork and Sweetcorn Rice"

Mum also says this recipe can easily be made into a delicious casserole-y type sauce to serve on rice.
Simply omit the water, brown diced or minced marinated pork or beef first in a tiny touch of oil then add the can of creamed corn and finish with egg as above.
The resulting consistency should be "kind of like bolognaise sauce".]

I remember having this a lot as a kid. Who knew two dishes for which I have such fond memories could be so easy to reproduce!?

13 May 2012

Apple and Pear Pudding or "Fruity toad in the hole"

This evening I invited a few friends (who, like me, do not have their Mums in the same city as us to celebrate Mothers' Day) around for Sunday dinner. Did my standard lamb roast with honey & mustard (if I haven't blogged this recipe I will soon) which is often the orphan's Sunday dinner of choice at my place. Whilst I was waiting for everyone to arrive, I noticed my fruit bowl had a couple of huge red delicious apples and beurre bosc pears rattling around from last week's grocery shop and I decided dessert could be fun. After a quick squizzer on taste.com.au, searching apple+pudding, I found a lovely "Apple Sponge Pudding" recipe as a starting point. Basically I followed the recipe except I used two large red delicious apples and two large beurre bosc pears in lieu of the 6 apples the recipe calls for. I also could not for the life of me find my jar of "mixed spice", so I added cloves to the fruit stew mixture and cinnamon to the pudding batter. I had also run out of icing sugar (I have been interstate for 3 of the last 5 weeks) - brown sugar sprinkled on top was just fine. There was some chocolate icecream in the freezer but no vanilla, which was a tad weird but still delicious. Will definitely try this recipe again, possibly with more fruit, and a different baking dish. Plus icing sugar and vanilla icecream. For a quick and easy pudding it was pretty good!

17 April 2012

Vongole (or let's be honest, any shellfish) Linguine (or let's be honest, any long pasta)

Here's a time-travelling one for you. I recently had a conversation with my lovely bestie Woffles. I'm not entirely sure how we gave her that name between today and all those years ago in Year 5, but it is definitely spelled with an "o" as in the Woffles, the talking rabbit in the Enid Blyton books - not with an "a" as in the foodstuff; and it certainly suits her. Anyhow, I was out walking with her by the river and we were talking about my love of molluscs, in particular bivalves - I often go to the markets and buy the freshest live mussels or clams that I can find and work my dinner plans around them. A very useful recipe I have tucked away in my recipe file is this gem for Spaghetti Vongole - yet another Neil Perry / Qantas Magazine recipe. My preferred long pasta is Linguine with Vongole but Fettucine (good with mussels) or Spaghetti or otherwise works just as well. I also refer to this recipe when cooking shellfish and just use the first part of the recipe as a reminder of cooking times and accoutrements. I can't seem to find my picture of the first attempt (and thus most faithful to recipe version) but will look through my other computer just in case. In the meantime here's an adjusted, musselicious & pastaless version of the recipe:
I believe these were live Mornington Peninsula mussels purchased that day from South Melbourne Markets in honour of a parental visit... and quite delicious, if memory serves...

19 January 2012

Free food Lamb Ragout

I'm living in employer-provided accommodation, and remembering how flaky and unreliable electric cooktops and ovens are!
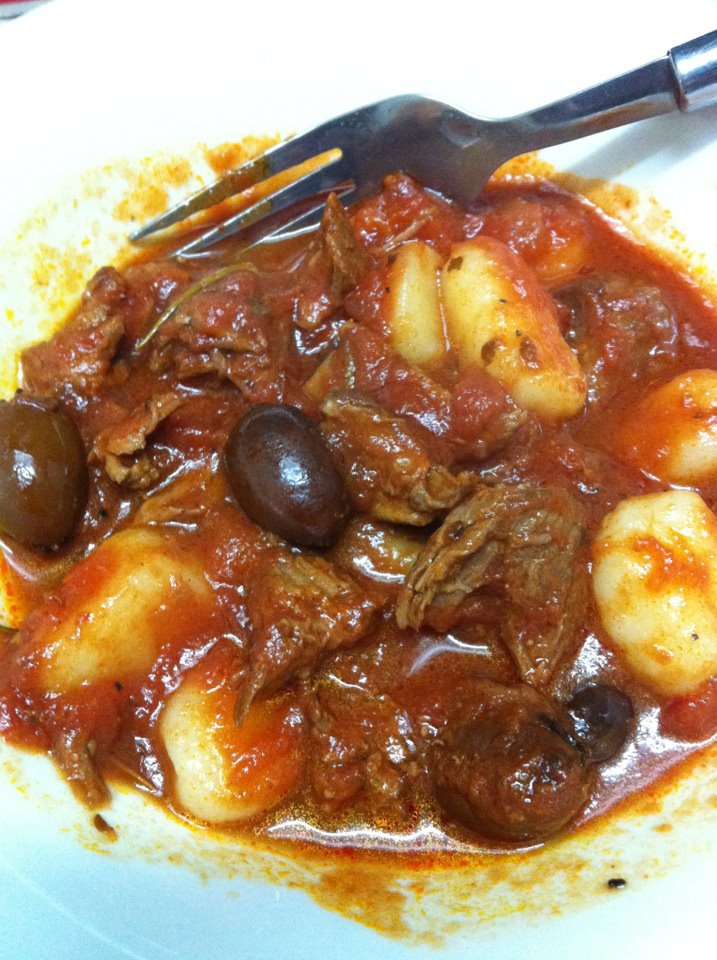
The kind person who lived here before me left me a bunch of food on our contract changeover, including vac-packed gnocchi (which I had never cooked with before) and a frozen tray of leg lamb steaks.
Having recently eaten a modest/shared serve of very delicious ragout at a Tapas-style hipster caf on a short holiday, I had a hankering for more and was happy to use up the mysterious free food in the flat on my return as it was all too hard to go to the grocery shop.

Ragout is so yummy and restaurant-y, but I have worked out (see also Roo Ragoo) it is basically a case of:
brown the meat in olive oil in a hot pan (seasoned with flour/salt/pepper or not) & remove from pan;
add new oil and onion/garlic/herbs/spices to the pan, then vegies & re-add the meat;
then smother with a tin of tomatoes, tomato paste, stock (chicken, beef or vegie) & wine; bring to the boil, then turn down to a simmer and cook for at least 2 but ideally 3 hours.
There is a flurry of activity at the start, but then you can just sit back, enjoy the soothing sounds & smells of simmering whilst watching TV/drinking/socialising etc...

I had the leg lamb steaks (mostly thawed), which I browned. I left them in the pan due to a minimalist accompaniment of half a large jar of kalamata olives (drained and rinsed) which I then added over the lamb. I seasoned with HEAPS of black cracked pepper, dried thyme, dried oregano, some wilted rosemary sprigs found in the back of the fridge, powdered garlic, powdered ginger and a sprinkle of chili flakes and salt. Then in went a tin of diced tomatoes, 2x 50g sachets of tomato paste and a 250mL box of pre-made chicken stock. I added a small dash of balsamic vinegar and a splash of worchestershire sauce (another freebie) to add some oomph. I sadly did not have any wine or onions, which made me nervous as these have always been a mainstay in the past (of my pantry and my ragout). It was all brought to the boil (the high setting on the stove is like HADES! bubbling cauldron of doom!), then down to a happy simmer, lid half on.

I watched telly, unpacked my suitcase, did a load of laundry, watched more telly, played on the internet, watched more telly... I think in total I had simmered it for almost two hours when I realised the whole steaks, maybe from being frozen prior, were not really flaking and falling apart as I had expected. I took the meat out of the pan and cut it into chunks then flaked/shredded with a fork and returned it to the liquid to continue. I think just before the three hour mark I got hungry, so I boiled up the gnocchi, which was quite a fun experience - add to boiling water then skim them off as they float to the top like a triumphant "ta da! I'm done!".


It was actually quite delicious, if not a tad light on vegetable matter. I pre-made serves in takeaway boxes of gnocchi plus ragout and I am pleased to say it lasts well and microwaves well too. My only problem was that that first night when it was fresh made I was hungry, it was yummy and I ate two HUGE serves, so didn't quite have enough left to last my next stretch of shifts. Not really a negative, a positive for taste I suppose. I'm very happy at being introduced to this instant gnocchi concept. I'll definitely try another version again!

11 January 2012

Making friends with ovens with chicken

It was the turn of the century (sounds classier than "entering the noughties"). I was watching TV and channel surfing ("you're worse than a man!" was one of my ex-boyfriend's exasperated cry once) as I do. My puny ADHD brain managed to pause just long enough on the lovely Stefano's Gondola on the Murray TV show (at least I think that's what it was) to see a lovely family picnic dish of moist, tomatoey chicken with crispy parmesan and oregano crust surrounding by a loving nest of potato wedges. That image has burned itself into the "comfort food" lobe of my brain, and I have made this dish (in many Impressionist brushstrokes incarnations) more times than I can count as a go-to for dinner parties, a nice treat for myself or comfort food in times of disquiet.

As I am currently living in employer-provided accommodation in the desert, and was a teensy bit unwell and homesick, here is the latest version to prove yes, you can make friends with ovens, no matter how basic and crochetty they may be, and even if you are cooking with disposable tinfoil trays for want of an actual roasting pan:


For comparison, here is an earlier study of the same work ("Chicken descending staircase with pyrex frame, real oven method #2" I like to call it):


"Enough painterly analogies!" I hear you cry. So here is the (or my version of a sort-of) recipe (idealised, open to intrepation, and I do):


MEDITERRANEAN ROASTED CHICKEN AND POTATO WEDGES IN ONE PAN

Ingredients:

Ideally 8 skinless chicken thighs (or 500g to a kilo of chicken, depending on shop tray sizes)

6 medium potatoes or equivalent

Tub or sachet of tomato paste
Similar amount of water
Similar amount of white wine
A squeeze of lemon juice
- or, a jar of pre-made tomatoey pasta sauce (as in picture #1)

Olive oil spray or neat
Dried oregano (or marjoram; or twice as much fresh, or a mixture of both)
Parmesan cheese (powdered is fine)
Cracked black pepper
A touch of salt

An optional handful of kalamata olives and/or halved cherry or grape tomatoes.

Method:

Use a generous sized roasting pan (or tinfoil BBQ tray).

Preheat oven to 180-200 degrees.

Cut potatoes into wedges, peeling optional. Microwave or parboil them before or after wedging until just cooked. Coat with a light sheen of olive oil, salt lightly, pepper heavily, generously apply oregano and parmesan. Arrange around the edge of the roasting pan.

Cut the chicken thighs in halves or if using other chicken parts cut into manageable and/or uniform sizes (I prefer thighs, then drumsticks, then wings, less so breast meat for this dish). Place pieces and drained olives in centre of roasting pan surrounded by potato fortress. Apply tomato paste + water + wine/instapastasauce and lemon juice, and mix until chicken is coated well. Some staining of nearby potatoes is encouraged. Over entire pan apply liberal amounts of cracked pepper, oregano and parmesan which will form crispy crust of deliciousness.

Place entire pan into oven. The dish will take roughly 45 minutes to 90 minutes to cook depending on how much you have put in the pan and how crap your (albeit rent free) oven is. Have tinfoil to cover the dish for the first 15-30 minutes of cooking then uncover to allow to crisp up the crust.

Serve with a salad of cos and avocado with lemon/olive oil/thyme dressing; or a roasted fennel salad depending on the season.

Best enjoyed with a big group of friends at a dinner party (chuck it all in the oven, then drink with your friends while the place fills up with the awesome aroma) or picnic (just carry the whole big dish to the rug or table) - who will ooh, aah then say nothing at all as they stuff their faces. Surprisingly, this dish is also good as a simple "keeps well" dish for sectioning off into take-away boxes for a week's worth of work food that you definitely won't get sick of!

24 September 2011

Choc chip cookies

Many years ago (we're talking back when we were teens and baking was a terrible mystery to me involving numbers, burning things & general fear) my mate Tina made amazing choc chip cookies and very kindly convinced me it was very simple and gave me her awesome recipe... which turned out to be a clipping from a magazine ad for choc chips!

The recipe I have written in my precious recipe folder goes something like this:

Ingredients:
125g butter at room temperature
1/3 cup smooth peanut butter
1 cup brown sugar
1 egg
1/4 cup Baking Cocoa
1/2 cup plain flour
3/4 cup self raising flour
250g (one pack) choc chips

Method:
1. Preheat oven to 180°C.

2. Cream butter, peanut butter and sugar. Beat in egg, mix well. Stir in sifted cocoa and flours. Add choc chips. Mix well.

3. Roll heaped teaspoonfuls (or dessert spoons for bigger cookies) of mixture into balls. Place on baking trays lined with baking paper. Press with a fork or fingers into cookie shapes.

4. Bake 12 minutes or until golden. Cool on tray.

By the power of the internets, I also found this more precise version for those dear readers who prefer to be new & improved!

After many years of various cookie recipes, I still go back to this one as it is seriously delicious. 9 out of 10 workmates agree! 1 in 10 workmates are trying to lose weight but still can't resist the deliciousness that is homemade choc chip cookies mwahahahaha. Also, you do need to warn nut allergy sufferers that it is forboden on account of the peanut butter!

Here is one of the most recent batches, made for nightshift and eaten prematurely whilst watching the rugby with the boy (yes, he was allowed to eat some too).


As for following recipes, per se... I use whichever (dark or milk) chocolate chips or just broken up bits of chocolate to be honest. Also I never have worked out how one is supposed to "measure out" peanut butter without making an almighty mess so I usually just scoop out "some" from the jar - no two batches have ever been the same, but that's the fun part!

19 September 2011

Coffee and Hazelnut Yorkshire Puddings

I had every intention of baking some mini-muffins the night before the picnic, both to inaugurate the long-forgotten brand new mini-muffin tray bought on a panic eyed grocery store late nighter, and to have, you know, mini-muffins to bring to the picnic.

Time got away from me during the (first) day (off I've had in ages), although I did get a chance to spot a nice recipe on page 26 of The Australian Women's Weekly mini-book aptly named "muffins" (reprinted by popular demand) for coffee hazelnut muffins - which had too many ingredients, including TWO types of flour AND hazelnut meal (pfft, guffaw). The hazelnut frosting - more ingredients! how?! - looked divine but I was struck with a case of the afternoon catnaps. I have way too many of those TAWW mini-books from aforementioned late night grocery store antics. They made a good nesty pillow. Groggy but determined, I managed to narrow down an internet search later that evening to a few recipe ideas, particularly liking the four-ingredient recipe at this very cool baking blog. I then fell asleep and didn't wake up until picnic o'clock the next day.

Blast!

So in true style, half breakfasting/espresso machining and half baking/inventing I set about destroying a perfectly good egg by mixing it with (a large) half of a jar of nutella & an innocently tepid shot of espresso and creating cold fusion, erm, "caffeinated mixing bowl scrambled egg". With that revelation and an internal monologue deal to forfeit coiffing and making upping, I set about inventing and baking:

Coffee and Hazelnut Yorkshire Puddings
(or, Coffee and Hazelnut Mini-Muffin attempt #2)

Pre-heat oven to 180 degrees.

Beat an egg until light and fluffy.

Mix in an unmeasured (blast!) amount of nutella - say, two generous dessertspoonfuls with additional teaspoon/dessertspoon scrapings from the small nutella jar insides - until well combined and glossy.

In said residualated nutella jar, mix a teaspoon of instant coffee with a splish splosh (please, say it in a Flight of the Conchords voice) of tap water - re-lid and shake it, shake it (like a polaroid picture, ooh ooh) to dissolve all the jar-wall nutella into the liquid. Add this to the above mix and stir in well.

Ponder about the difference between imperial vs metric teaspoons (?) and then add one (metric) level teaspoonful after another of plain flour to the mix, mixing until you have added roughly 6 and a half metric teaspoons of flour or until you have what you think could possibly be muffin mix.

Add a handful of chocolate chips to taste.

Spray your mini-muffin tin with olive oil spray.

Put a generous tablespoon of the mix into each mini-muffin port, then top with whole coffee beans (I left some without in an attempt to be kid-friendly).

Bake in a moderate oven (180 degrees for most, 185-190 for mine) for ten to fifteen minutes, or until you are dressed, have found your picnic rug and assembled some cheese, crackers and plastic plates in a bag.

Remove from oven and marvel at how you have unintentionally created coffee and hazelnut miniature yorkshire puddings, turn them out onto some kitchen paper on a rack and taste-test them, with validation from your significant other (who is employing some fine duck-and-cover in the other room, away from the "baking"). Find your sunnies, grab a water bottle then put the c-a-h yp's into a box, bring them to the park and enjoy sharing them with your friends in the impossible sunshine. Remark at how adorably bouncy your friend's 2-year-old angel becomes upon discovering her previously unrequited love of roasted whole coffee beans! Seriously cute!


Perhaps in future I will take the time to add another egg, tinker with self-raising flour, bother to chill a real espresso shot and consider adding milk to the mix. Experimental cooking is bliss! Bring on attempt #3...after I try some other new things out first...

ADDIT: Here's batch #3... getting better...